

Supplemental Direction ED 25-03: Core Dump and Hunt Instructions
Core Dump & Hunt Instructions for Cisco ASA Devices
The following guidance is being provided to help entities check the status of their Cisco devices. It is prudent that all network defenders follow the listed guidance and contact CISA, if signs of compromise are observed.
Background
CISA is aware of a campaign being actively conducted by a sophisticated threat actor that exploits Cisco Adaptive Security Appliances (ASA) via web services. The campaign uses a URL path-normalization flaw that can bypass session verification for protected Clientless SSL VPN (WebVPN) endpoints, and a heap buffer overflow in the WebVPN file-upload handler that can lead to information disclosure. Software versions after 9.17.1.40, 9.18.4.41, 9.19.1.32, and 9.20+ are not vulnerable to the overflow because the handler was removed.
IMPORTANT NOTES – Read Before Proceeding
The listed steps must be completed in the order they are listed and exactly as written. Any deviation from the below guidancemay trigger the threat actor’s anti-forensics measures, which will destroy forensic data and disrupt ongoing investigations. CISA is not aware of all anti-forensics and operational security measures established by the threat actor, but the below are examples based on what has been observed, so far.
- Do NOT use the “tab” autocomplete or any other autocomplete function. The threat actor has hooked these commands to crash the device.
- Do NOT take any other remediation actions beyond what is described below (i.e., blocking IPs, etc.) without consulting with CISA first. The threat actor is closely monitoring for changes and is able to pivot rapidly to new infrastructure.
Any deviation from the guidance in this document may trigger the threat actor’s anti-forensics measures, which will destroy forensic data and disrupt ongoing investigations.
Part One: Collect Artifacts from the Device
Before completing the steps in this section, confirm the following details related to your device and notate them for submission later:
- Model type
- Serial Number
- Version
The guidance in this document is specific to Cisco ASA devices. If your device is not a Cisco ASA device, no further artifact collection is required, please follow the remaining steps in Emergency Directive (ED) 25-03: Identify and Mitigate Potential Compromise of Cisco Devices.
Step One: Run Initial Commands and Collect the Outputs
The following commands should be run on devices before a core dump is collected. The output from these commands will be crucial for analysis, if a device is compromised, and may be requested by CISA at a later date. Entities should save the output, in case.
-
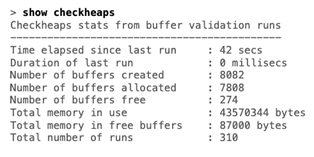
Run the “show checkheaps” command.
- Confirm and notate the time of the last successful checkheaps command.
- Copy the output and save it off to a location separate from the Cisco device, preferably on a system that is isolated from the rest of the network.
- Wait 5+ minutes and run the command again. Look specifically at the return in the last row, which indicates (“Total number of runs”).
- It should increase by 1 every 60 seconds for the time period between the checks you perform (i.e., if the command is executed five minutes apart, the number should increase by approximately five).
- Notate the number reflected and whether there was an increase.
- If there was no observable positive change in the “Total number of runs” value, this is evidence of a potential compromise.
- Note: When “show checkheaps” is run it will display the following output:
-
Run the “show tech-support detail” command.
- This command outputs a trove of data on the device by automatically running a long list of various show commands. The following information is important to gather from that output:
- Uptime
- ROM MON version
- ASA version
- Last crashinfo
- Save the output in a location separate from the Cisco device, preferably on a system that is isolated from the rest of the network.
- This command outputs a trove of data on the device by automatically running a long list of various show commands. The following information is important to gather from that output:
-
Run the following command to check for the presence of the threat actor’s implant:
more /binary system:/text | grep 55534154 41554156 41575756 488bb3a0- Save the output in a location separate from the Cisco device, preferably on a system that is isolated from the rest of the network.
- If you receive any output from running this command, it means the device has been compromised.
Step Two: Core Dump Collection
Important note: The below steps (specifically, steps one, two, and three) will trigger an immediate reload of the ASA device. This may lead to network degradation or outages.
- Power off the device and reboot it.
- This is done to ensure the highest chance of success of correctly collecting a core dump.
- Prepare to collect a core dump.
- Configure the ASA to generate a core dump by running the following commands:
config tcoredump enable filesystem <filesystem>- where, often times, <filesystem> is “disk:0”
- Configure the ASA to generate a core dump by running the following commands:
- Collect a core dump, and save a copy.
- Initiate a core dump using the following command:
crashinfo force page-fault
- Once the device reboots, transfer the zipped core dump file from the system to an external storage using one of the below commands.
-
If the device is still connected to the network, use:
copy disk0:/coredumpfsys/<filename.gz> [scp:/ftp:/tftp:] - If the device has been disconnected or isolated from the network:
-
To save on a removable storage device, use:
copy disk0:/coredumpfsys/<filename.gz> disk1:/<filename.gz>- Note: The storage device must be FAT32 formatted for the Cisco device to utilize it properly.
-
To save on an external laptop or device, use:
copy disk0:/coredumpfsys/<filename.gz> scp://username@192.168.0.1/path/to/file/<filename.gz>
-
-
- If nothing is written during the core dump (i.e. if nothing appears in the file system after running the commands):
- Notate this.
- Examine the output that was provided and look for any errors being flagged.
- One common error is “Disk0: free space is too full to write a coredump.”
- Once you’ve checked for any flagged errors, run the commands one more time.
- If the command was successful on the second attempt, inform CISA.
- If there is still no written output, notate this, and inform CISA. It is still possible that an error is occurring, or this result could be an indicator of compromise.
- Note:
- Core dumps will have file names similar to the following (although the date and numeric characters will vary):
- "core_smp.2025Sep16_165718.1575.11.gz”
- “core.lina.16412.1756344191.gz”
- A “coredumpfsysimage.bin” file may also appear; however, this is not a core dump. It is a binary used during the process of dumping the memory out to a file and should not be uploaded.
- Core dumps will have file names similar to the following (although the date and numeric characters will vary):
- Initiate a core dump using the following command:
- Collect the text segment memory dump, and copy it from the device.
show version | inc Version- verify
/sha-512 system:memory/text - copy
system:memory/text ftp - Note:
- CISA recommends recalculating the hash of the file after it has been transferred from the device and comparing the value to the hash that was calculated after running command #2 (
verify /sha-512 system:memory/text). - If the device crashes after running these commands, notate it and inform CISA, as this could be an indicator of compromise.
- CISA recommends recalculating the hash of the file after it has been transferred from the device and comparing the value to the hash that was calculated after running command #2 (
Part Two: Upload Core Dump in CISA Malware Next Generation
To upload a core dump to Malware Next Generation (MNG), you must have a login.gov account and be registered with MNG.
For the purpose of creating MNG accounts and submitting core dump samples:
- Government users – refers to users that have registered for an MNG account using an email ending with .gov or .mil
- Non-Government users – refers to users that have registered for an MNG account using an email address not ending in .gov or .mil
- If you do not have a login.gov account, follow Steps 1-4 outlined below to create one and register with MNG.
- If you are an existing MNG user, proceed to Step 5.
Creating your MNG Account
- Using a web browser, navigate to https://malware.cisa.gov.
- Select the “Create an Account” option and follow instructions to create a Login.gov account.
- Note: Your login.gov account will be used to access MNG and allow you to upload Core Dump samples for analysis.
- After creating your login.gov account, you will be directed to the malware Next-Gen registration page, where you will need to provide your contact information.
- Note: This information is used only to contact you to provide support, if needed, and will not be shared with anyone outside of CISA.
- Once Malware Next-Gen registration is complete, you will be taken the MNG Home page. This is where you can view your existing submission reports or submit a sample for analysis.
- Note: It may take a moment for permissions to be assigned to your account. If you receive a message stating you do not have permission to access this web page, wait a moment and refresh.
Submitting a Core Dump Sample for Analysis
- Click on the “Submit” link in the blue banner at the top of the page
- Select “Choose File” on the submission form
- Browse to the location on your system where you saved the core dump file that was collected in “Part One” of this document, and double-click on the file.
- Note: Submit the file as it was collected from the ASA device.
- Do not package the core dump in any additional archive formats.
- Do not bundle multiple core dumps. If you need to submit multiple core dumps, you will need to repeat this process starting with Step 5.
- Once the file is selected, you will be returned to the submission form.
- Verify the file you intend to submit is listed to the right of the “Choose File” icon.
- Users registered with .gov or .mil accounts will see a “Core dump” check box. Check this box if submitting a core dump sample. Non-government users are only able to submit core dumps, and as a result do not have the option to select sample type.
- Government users, select desired “Traffic Light Protocol”. Non-Government user submissions do not have this option. All non-government users core dump submissions will be treated as TLP AMBER+STRICT and not shared outside of CISA.
- In the “Comments Section,” include the following:
- Device information (model, serial number, version, and mode).
- Information on any errors or issues you experienced while completing the core dump (“Part One: Step Two” of this guidance).
- Any other comments you wish to provide in the comment section.
- Check the box to agree to the Malware Next Gen Terms of Service, Privacy Act Statement and CISA’s Privacy Policy.
- Check the box to acknowledge submission agreement
- Click on the “Submit” button to submit the core dump sample. Based on the sample size and your network speed, it may take several minutes to upload. Once the sample is uploaded, you will receive a confirmation message:

- If you have an additional core dump you need to submit, you can select the “Submit Another” option to submit any additional core dump samples.
- Repeat Steps 5 – 13.
- If you do not have additional core dump samples to submit, click “View all Samples” to return to the home page and see analysis results.
Viewing Analysis Results
- Analysis results are shown on the MNG Home Page. Each submission will be listed with the date and time of submission.
- A verdict of “Clean” or “Malicious” should be displayed to the right of each submission listing.
- A more detailed output of scan results can be seen by clicking on the arrow to the left of the submission date/time stamp, then clicking on the TID (Transaction ID).
- Under the “Download Reports” tab, click on the “COREANALYSIS” report.
- If the report indicates “No Compromised Detected”, no further action is needed from your agency, at this time.
- If the report indicates “Compromise Detected” please click on the “Guidance” tab for additional information, or proceed to “Part Three” and “Part Four” of this guidance document.
Part Three: Apply Patch Following Instructions in CISA’s Emergency Directive and Cisco’s Public Release
Once “Part One” and “Part Two” of this guidance are complete, entities should apply the patches released by Cisco and consult the instructions in CISA’s Emergency Directive 25-03 and Cisco’s Public Release.
The below are specific points in Cisco’s guidance that CISA would like to highlight.
While applying the patch:
In line with Cisco’s guidance, during the initial boot of the device (part of the upgrade process), entities should monitor the messages that appear on the device console. Specifically, look for the below messages:
| Message #113 : Verifying bootloader: Message #114 : .Message #115 : .Message #116 : .Message #117 : Bootloader verification succeeded.Message #118 : Verifying ROMMON: Message #119 : .Message #120 : .Message #121 : .Message #122 : .Message #123 : ROMMON verification succeeded. |
If the above messages are seen, it could indicate that the persistence mechanism observed as part of this threat activity were not present on the device.
If the above messages are different (i.e., if the highlighted messages start with “Bootloader verification failed at address” or “ROMMON verification failed at address”), then this could be an indication that the persistence mechanism observed as part of this threat activity were present on the device.
After applying the patch:
Entities who upgraded an ASA 5512-X, 5515-X, 5525-X, 5545-X, 5555-X, or 5585-X device to ASA release 9.12.4.72 or 9.14.4.28 should look for a file called firmwareupdate.log on disk0:.
The existence of that file could indicate that the device was compromised prior to the upgrade to ASA release 9.12.4.72 or 9.14.4.28.
Part Four: Further Hunt Instructions
If the MNG results for a device show that malicious indicators have been detected, if the firmware-update.log is found on disk0, or if the messages seen on the device during upgrade varied from the message included previously, then:
- FCEB agencies should follow the instructions in the Emergency Directive.
- Other U.S. organizations should contact CISA via the Incident Reporting System or through CISA’s 24/7 Operations Center (contact@cisa.dhs.gov or 888-282-0870).
- Cisco customers should open a case with the Cisco Technical Assistance Center (TAC) here: https://mycase.cloudapps.cisco.com/case.
- In the case, include the output of the show tech-support command and the content of the firmware-update.log file.
Additionally, in conjunction with Cisco’s released guidance, network defenders should follow the below threat hunt guidance to detect further malicious activity, as the threat actor may have pivoted from the compromised device to other areas of the network. In contrast to previous sections, the following threat hunt guidance does not necessarily need to be completed in the order listed; however, the only way analysts have been able to successfully track threat actor post-compromise activity is by identifying compromised user accounts, first.
Note: Investigations related to this issue are still ongoing, meaning that certain elements of the malicious activity remain unknown. Current findings suggest that the malicious activity likely began before or as early as 2024. The below threat hunt guidance is being provided based on the activity CISA has observed thus far, and CISA will continue to provide updated information, as it becomes available. Additional information related to this malicious activity can also be found in the following report published by the United Kingdom National Cyber Security Centre: https://www.ncsc.gov.uk/static-assets/documents/malware-analysis-reports/RayInitiator-LINE-VIPER/ncsc-mar-rayinitiator-line-viper.pdf
CISA encourages all entities to do their own due diligence and report back findings to CISA, especially if new malicious activity or detection methods are observed.
Step One: Identify Compromised Accounts
Network defenders should begin threat hunt efforts by identifying possibly compromised accounts. Based on current investigations, the most reliable way to do this for this specific threat activity is by monitoring and searching for impossible travel logins; however, all logins through the compromised device should be heavily scrutinized.
Monitoring & Searching for Impossible Travel Logins
Suspicious logins from geographically distant IP addresses can be detected using the below methods.
Query the below.
index=<NDR/Appliance> sourcetype=<log_source>
| search event_type="authentication"
| iplocation src_ip
| stats earliest(_time) AS first_login latest(_time) AS last_login by user, src_ip, City, Country
| where first_login != last_login AND distance_between(first_login_location, last_login_location) > 1000
| table user, src_ip, first_login, last_login, City, Country
Note: This syntax is crafted for Splunk Processing Language (SPL). This query may need to be tailored to the SIEM solution in place.
Check for the below syslog message IDs.
- For informational level syslogs:
- WebVPN session terminated: Idle Timeout : %ASA-6-716002
- For debug level syslogs:
- SVC Service Termination: %ASA-7-722029
- SVC Service Termination: %ASA-7-722030
- SVC Service Termination: %ASA-7-722031
Note: Informational level syslogs should be enabled by default (if they have been disabled, CISA recommends enabling them). Debug level syslogs are not enabled by default, though, and network defenders should consider enabling them, if manageable.
Step Two: Review Compromised Account Activity
Network defenders should monitor and search for the below activities known to be conducted by the threat actor after obtaining access to an account.
Scans of Printers
The threat actor has been observed conducting widespread scans of printers, largely across TCP port 443, once they have established a foothold in a victim’s network.
LDAP Queries to Enumerate Domain Controller
The threat actor has also been observed attempting to enumerate domain controller objects and services via a series of Lightweight Directory Access Protocol (LDAP) queries. These queries include:
servicePrincipalName=*cert*servicePrincipalName=*pki*servicePrincipalName=*public*objectclass=*
Tampering with Informational Syslogs
The threat actor is known to tamper with the below informational syslogs. Specifically, 302013 and 302014 message IDs are produced when users are making and terminating connections to the VPN. If 303013 and 302014 are absent, it is an indicator that a device contains the threat actor’s malware.
Looking at the history of 302013 and 302014 can provide a timeline of when the devices may have been tampered with by the threat actor.
- 302013
- 302014
- 710005
- 609002